
A client recently asked me how she could easily get rid of a list of old invoices which were marked "To Be Printed". She had over 2,000 invoices in this status. These particular invoices appear when she goes to print a batch of current invoices (to see this in QuickBooks, click on File, Print Forms, Invoices). This means she has to click on "Select None" and then select the current invoices she really does want to print. This client typically has 100-200 invoices twice a month that she really wants to print. While doing the above is not a huge issue for her, the issue is nonetheless annoying (I know it would annoy me).
Now, while you could actually do an Advanced Find, setting the filter "Printed Status" and set this filter to "To Be Printed", this would certainly result in locating the offending invoices. But this would mean 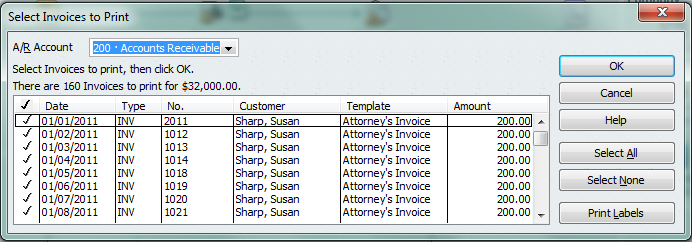 selecting each invoice one at a time, deselecting the "To Be Printed" check mark and then saving the invoice. If you only had a handful of invoices to deal with this would work just fine. But what if you have a 100 or, in the scenario above, more than 2,000 that you want to deal with? There must be an easier way, right?
Indeed there is an easier way...IF you have the Microsoft XPS Document Writer installed on your computer. Who has this installed? If you have Microsoft Office (or just about anything Microsoft related) chances are good you have this print driver installed. The Microsoft XPS Document Writer is simply a print driver which appears in your list of available printers when you go to print a document.
To use this driver AND to get rid of any old documents within QuickBooks that are in a "To Be Printed" status do the following:
- Within QuickBooks go to File, Print Forms and select the form type you want to print. In the scenario above, the forms were invoices.
- A list of the To Be Printed forms will appear. Select "OK" indicating you want to send them to the printer.
- After a few seconds a print dialog box will appear. Within the "Printer name" drop down box, select the Microsoft XPS Document Writer as the printer you want to use.
- Select "Print". You will next be greeted with a screen prompting you to give your print job a name. Give it any name you desire. Also, make a mental or physical note of where the file you are naming will be stored on your computer. This way you can easily find and delete the file created by the Microsoft XPS Document Writer afterwards. I typically save the file to my Desktop.
- Click "Save". Wait a few moments and you will be greeted with a "Print Invoices - Confirmation" screen. Click "OK".
- You have just cleared the subject forms. Find the file created by the Microsoft XPS Document Writer and delete it. As an aside, you can actually open the file created by the Microsoft XPS Document Writer and view the forms generated.
For more information about QuickTrainer, visit our website at www.quicktrainer.biz.
#ILM