

When using QuickBooks software, you will find there are numerous ways to get to the same screen. For example, let's say you want to get to the Chart of Accounts. From the Home Page, under the section which reads, "Company" you will see an option, "Chart of Accounts". Additionally, from the Top-Level Menu options, you can click on "List", "Chart of Accounts". Another way is to press the "Ctrl" key and, while keeping it pressed, press the letter "A" (this is called a keyboard shortcut and I personally love keyboard shortcuts).
Another way to get to the same screen is via the Icon Bar (across the top). I often find it is overlooked. How do I know when the Icon Bar has been overlooked? I see the default settings are displayed. By default, Intuit places many marketing type icons on this bar. It will typically look like the image below:
![]()
Note the icons User Licenses, Services, Credit Cards, Add Payroll, App Center; these are all icons strategically placed to sell you additional product and/or services. I'm not criticizing Intuit for placing these icons on the tool bar. They are simply doing, in my opinion, what most companies would do: trying to get their products and services noticed by you, the end-user. Heck, at QuickTrainer, we use many of these services (e.g., Intuit Merchant Services and Intuit Payroll) and love them!
Rather, I would much prefer to see users of QuickBooks remove these icons and replace them with icons you use on a frequent day-in and day-out basis. And that's the primary objective of this blog posting, to make you aware the Icon Bar can be personalized and non-useful icons can be replaced with useful and highly functional icons instead.
To begin customizing the Icon Bar, you can "Right-Click" anywhere on the Icon Bar. Alternatively, you can click on "View", and then "Customize Icon Bar...". Either way, the following screen will appear:
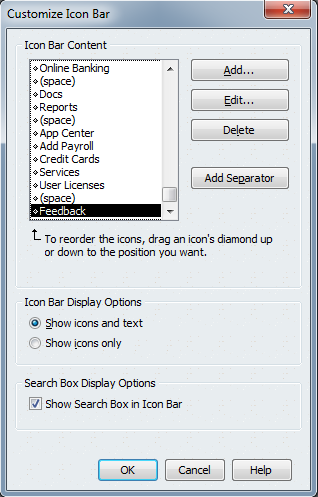
Beginning here, you can easily remove the unwanted Icons by selecting the icon and clicking on "Delete". Highlight and delete as many as you would like to. I personally tend to leave the icons, Home, Customers, Vendors and Employees. Don't have Employees? Delete it.
Next, click on "Add" and you will be greeted with this screen:
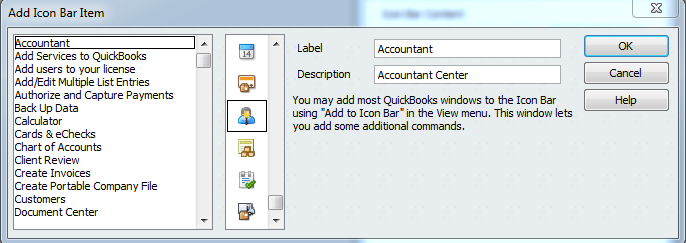
This screen allows you to begin adding commonly used icons. Also, notice you can assign your icons a graphical picture representation as well as a Label and Description. The Label is the text which will be displayed with your icon, while the "Description" is the text to be displayed when you place your cursor over the icon. Add the icon you desire and click "OK" once done.
One caveat to this customizing feature is you will often find there is an icon you would like to add but the option cannot be found in the list above. For instance, you won't find an option for "Receive Payments", "Make Deposits", "Pay Bills", just to name a few. Don't worry this blog addresses how you can easily overcome this in the next paragraph.
To add an icon to the Icon Bar that does not appear in the "Add" list, you simply begin by displaying the screen of choice. For instance, let's say you would like to add an icon for "Receive Payment". Simply go to "Customers" and click on "Receive Payments". With this screen displayed, next click on "View" and select 'Add "Receive Payments" to Icon Bar...'. This icon is added.
Now, let's discuss organizing your icons into a logical fashion on the Icon Bar. Once again, let's edit the Icon Bar. Notice, to the left of each Icon Bar Content list is a small diamond. If you place your cursor over a diamond, your cursor will change to a Cross Hair shape. Left click and hold your left mouse button down and move your cursor up or down. The Icon text moves. Order your icons into an order that makes sense to you. Below is a screen shot of how I have organized my icons for use when I log into QuickBooks:
![]()
When editing the Icon Bar, the option to "Add Separator" just allows you to better organize your icons. Notice the separators I have added in the picture above.
Finally, you need to understand that any customizations made to the Icon Bar are done so at the User level. This means if you login to QuickBooks as the Admin and make changes, these changes will stick as long as you continue to login as the Admin. If, on the other hand, you later find yourself adding other users to QuickBooks who will login under their own name then when they login their Icon Bar will take on the defaults QuickBooks assigns. To overcome this is simple. Point them to this blog article and they, too, will know what you now know: How to customize their Icon Bar making QuickBooks one step easier to use.
As always, if you have questions regarding this article, or any other questions regarding QuickBooks, leave us a comment or send us an email (info@quicktrainer.biz).
If you are struggling with something in QuickBooks and would like me to write a blog post about it, leave it in the comment section.
#ILM